Jan 23, 2023
AI via APIs
If you spend any amount of time on Twitter, you might have experienced something I like to call AI Fatigue: a combination of FOMO Fear Of Missing Out and the humbling feeling that this technology is way out of our league. AI is everywhere and is incredibly exciting, but for most of us—even for “technical” folks like traditional software developers—it continues to be a mysterious black box.
Thankfully, things are changing fast, and a new generation of products is making it easier than ever to start with AI.
In this post, I’ll share one of the fastest ways to get started building AI-powered applications. We’ll use Replicate’s API to create two web apps powered by machine learning models, and we’ll see how we can repurpose them to use completely different models with only a few small changes.
Let’s dive in!
What are we building
We’ll build two relatively simple apps using two different models hosted on Replicate: a Stable Diffusion client that can generate images out of a text prompt, and a background removal app. I’ve built both apps using Astro and Preact/React, but you can follow along using the framework of your choice.
You can find the source code for both projects on GitHub:
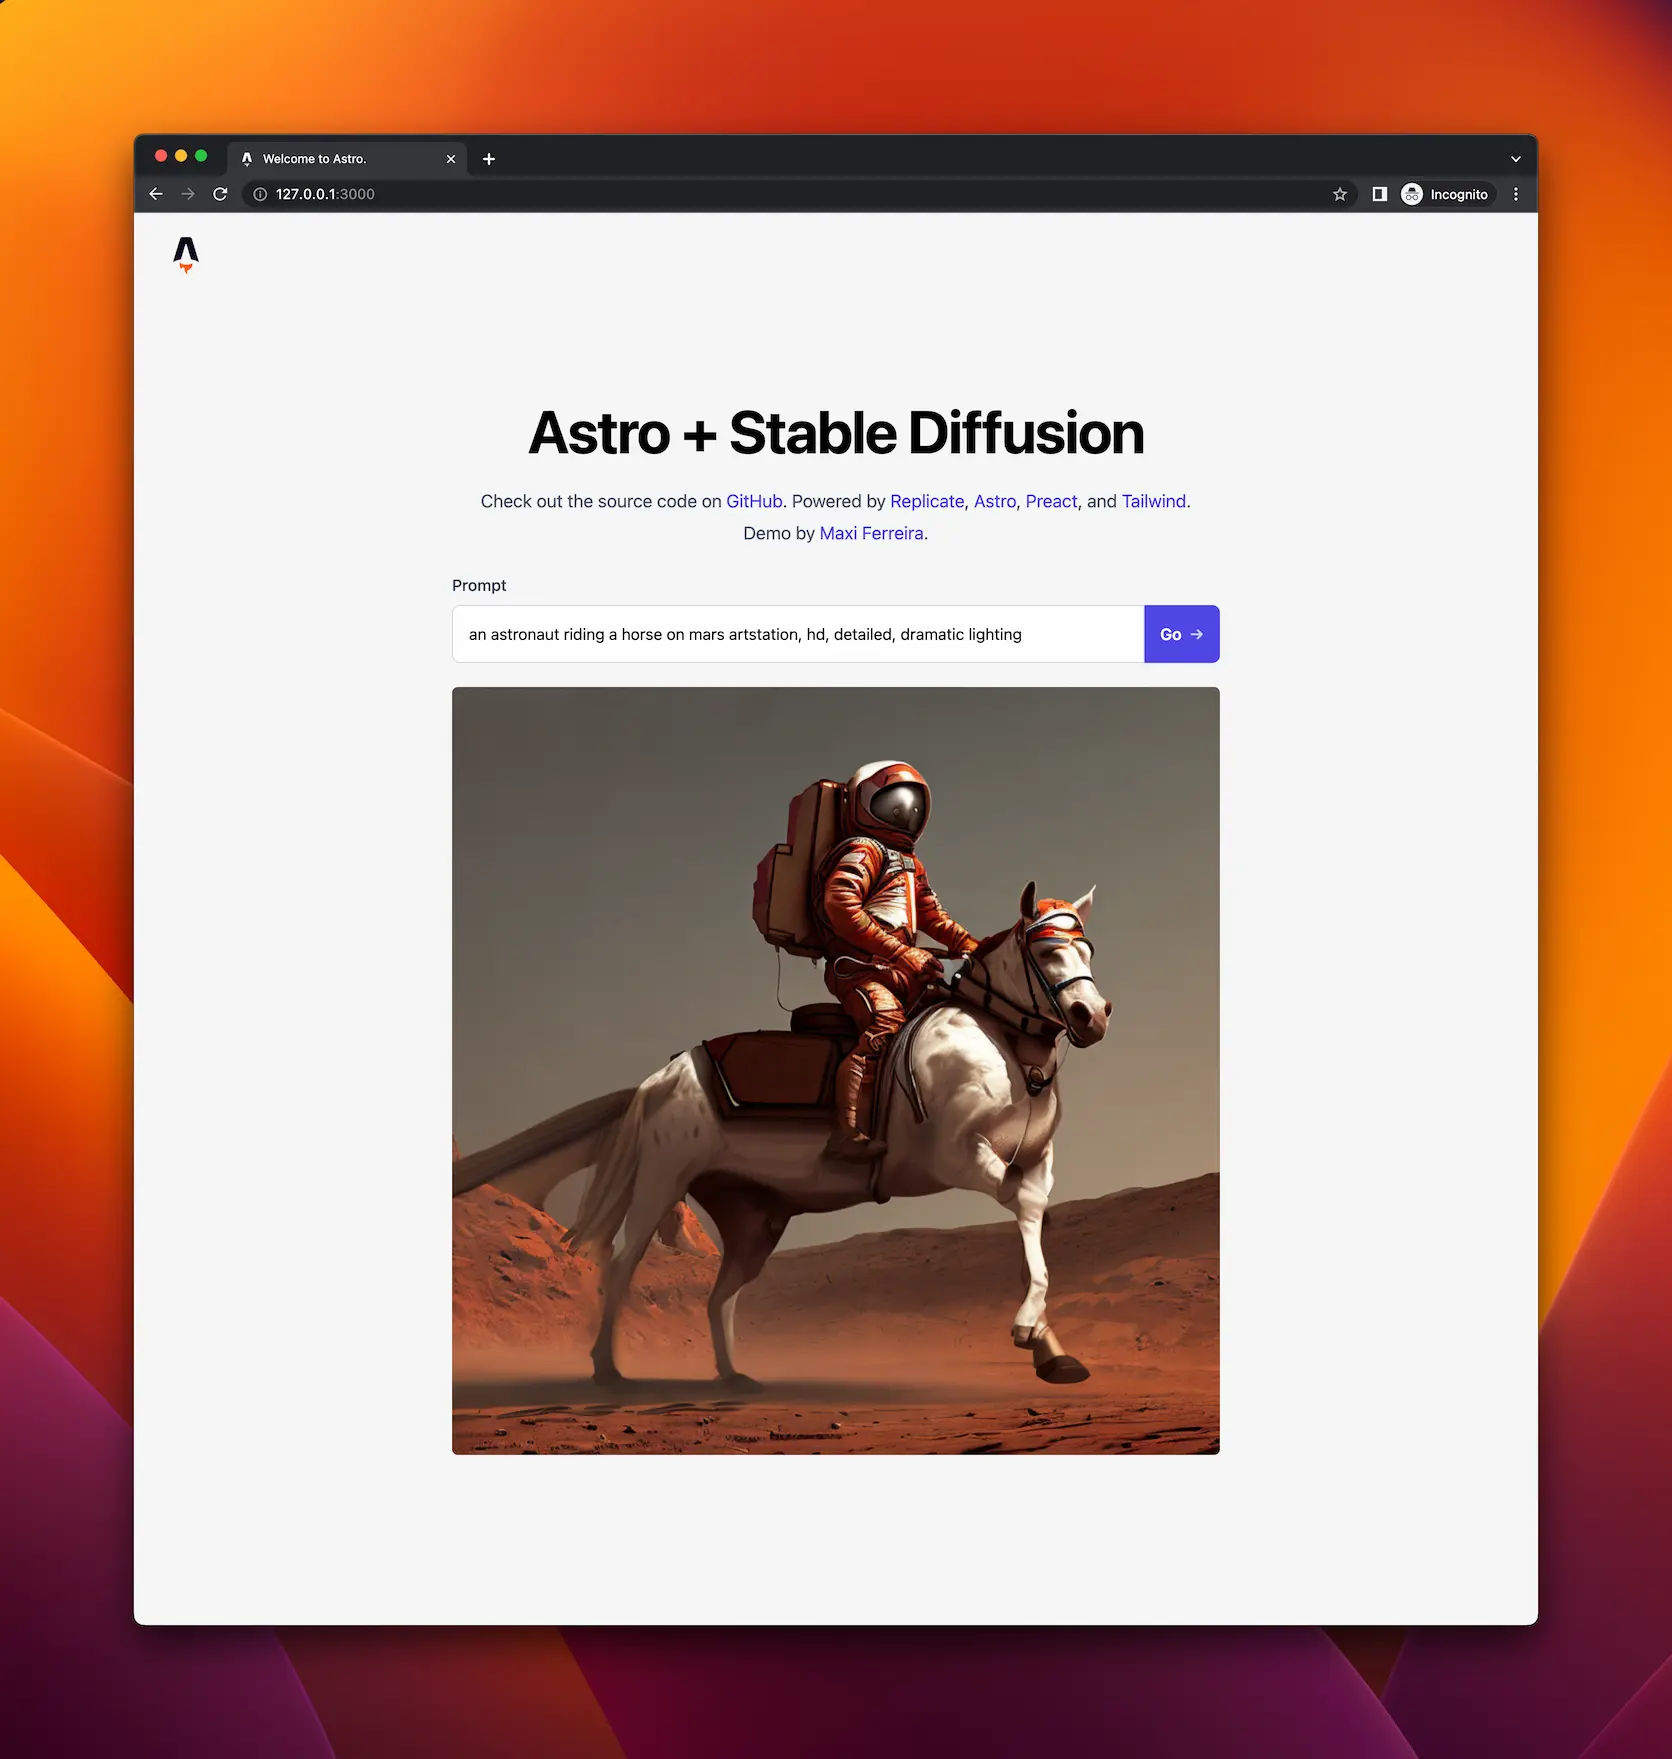
Here’s what the end result will look like:
Getting started with Replicate
Replicate is a service that lets us run pre-trained machine-learning models in the cloud. We can also use it to host our own public and private models, but for the apps we’ll cover, we’ll use two readily-available public models.
Before you can start making requests to Replicate’s API, you’ll need to create an account and get an API Token. Your Replicate account comes with a free trial consisting of several free credits, which should be more than enough to build the apps in this article. After your credits run out, Replicate will ask you to enter your payment information to continue using their API. If you choose to do it, I highly recommend you also set a monthly spend limit on your Account page to prevent being charged more than what your comfortable with. Once you create an account, you’ll find your API Token in your Account page.
Replicate has an impressive collection of machine learning models ready for you to use, and you can access any of them via a straightforward REST API, consisting of mainly two methods:
POST /predictions— Creates a “prediction” and returns its unique IDGET /predictions/:id— Returns the current status of the prediction
You can think of a prediction as a “job” or an event in a queue. Some of these models can take a long time to resolve, and we can’t always trust that a prediction will resolve in a timely manner. Diffusion algorithms, in particular, are extremely resource intensive: they can take anywhere from a few seconds up to a couple of minutes to complete depending on how busy or how fast a server is, which could cause a single request to timeout.
For this reason, we need to execute predictions in two steps:
- An initial call to the
POST /predictionsendpoint to start the job and get back a prediction ID. - Polling the
GET /predictions/:idendpoint until we receive either a “success” or “failure” result.
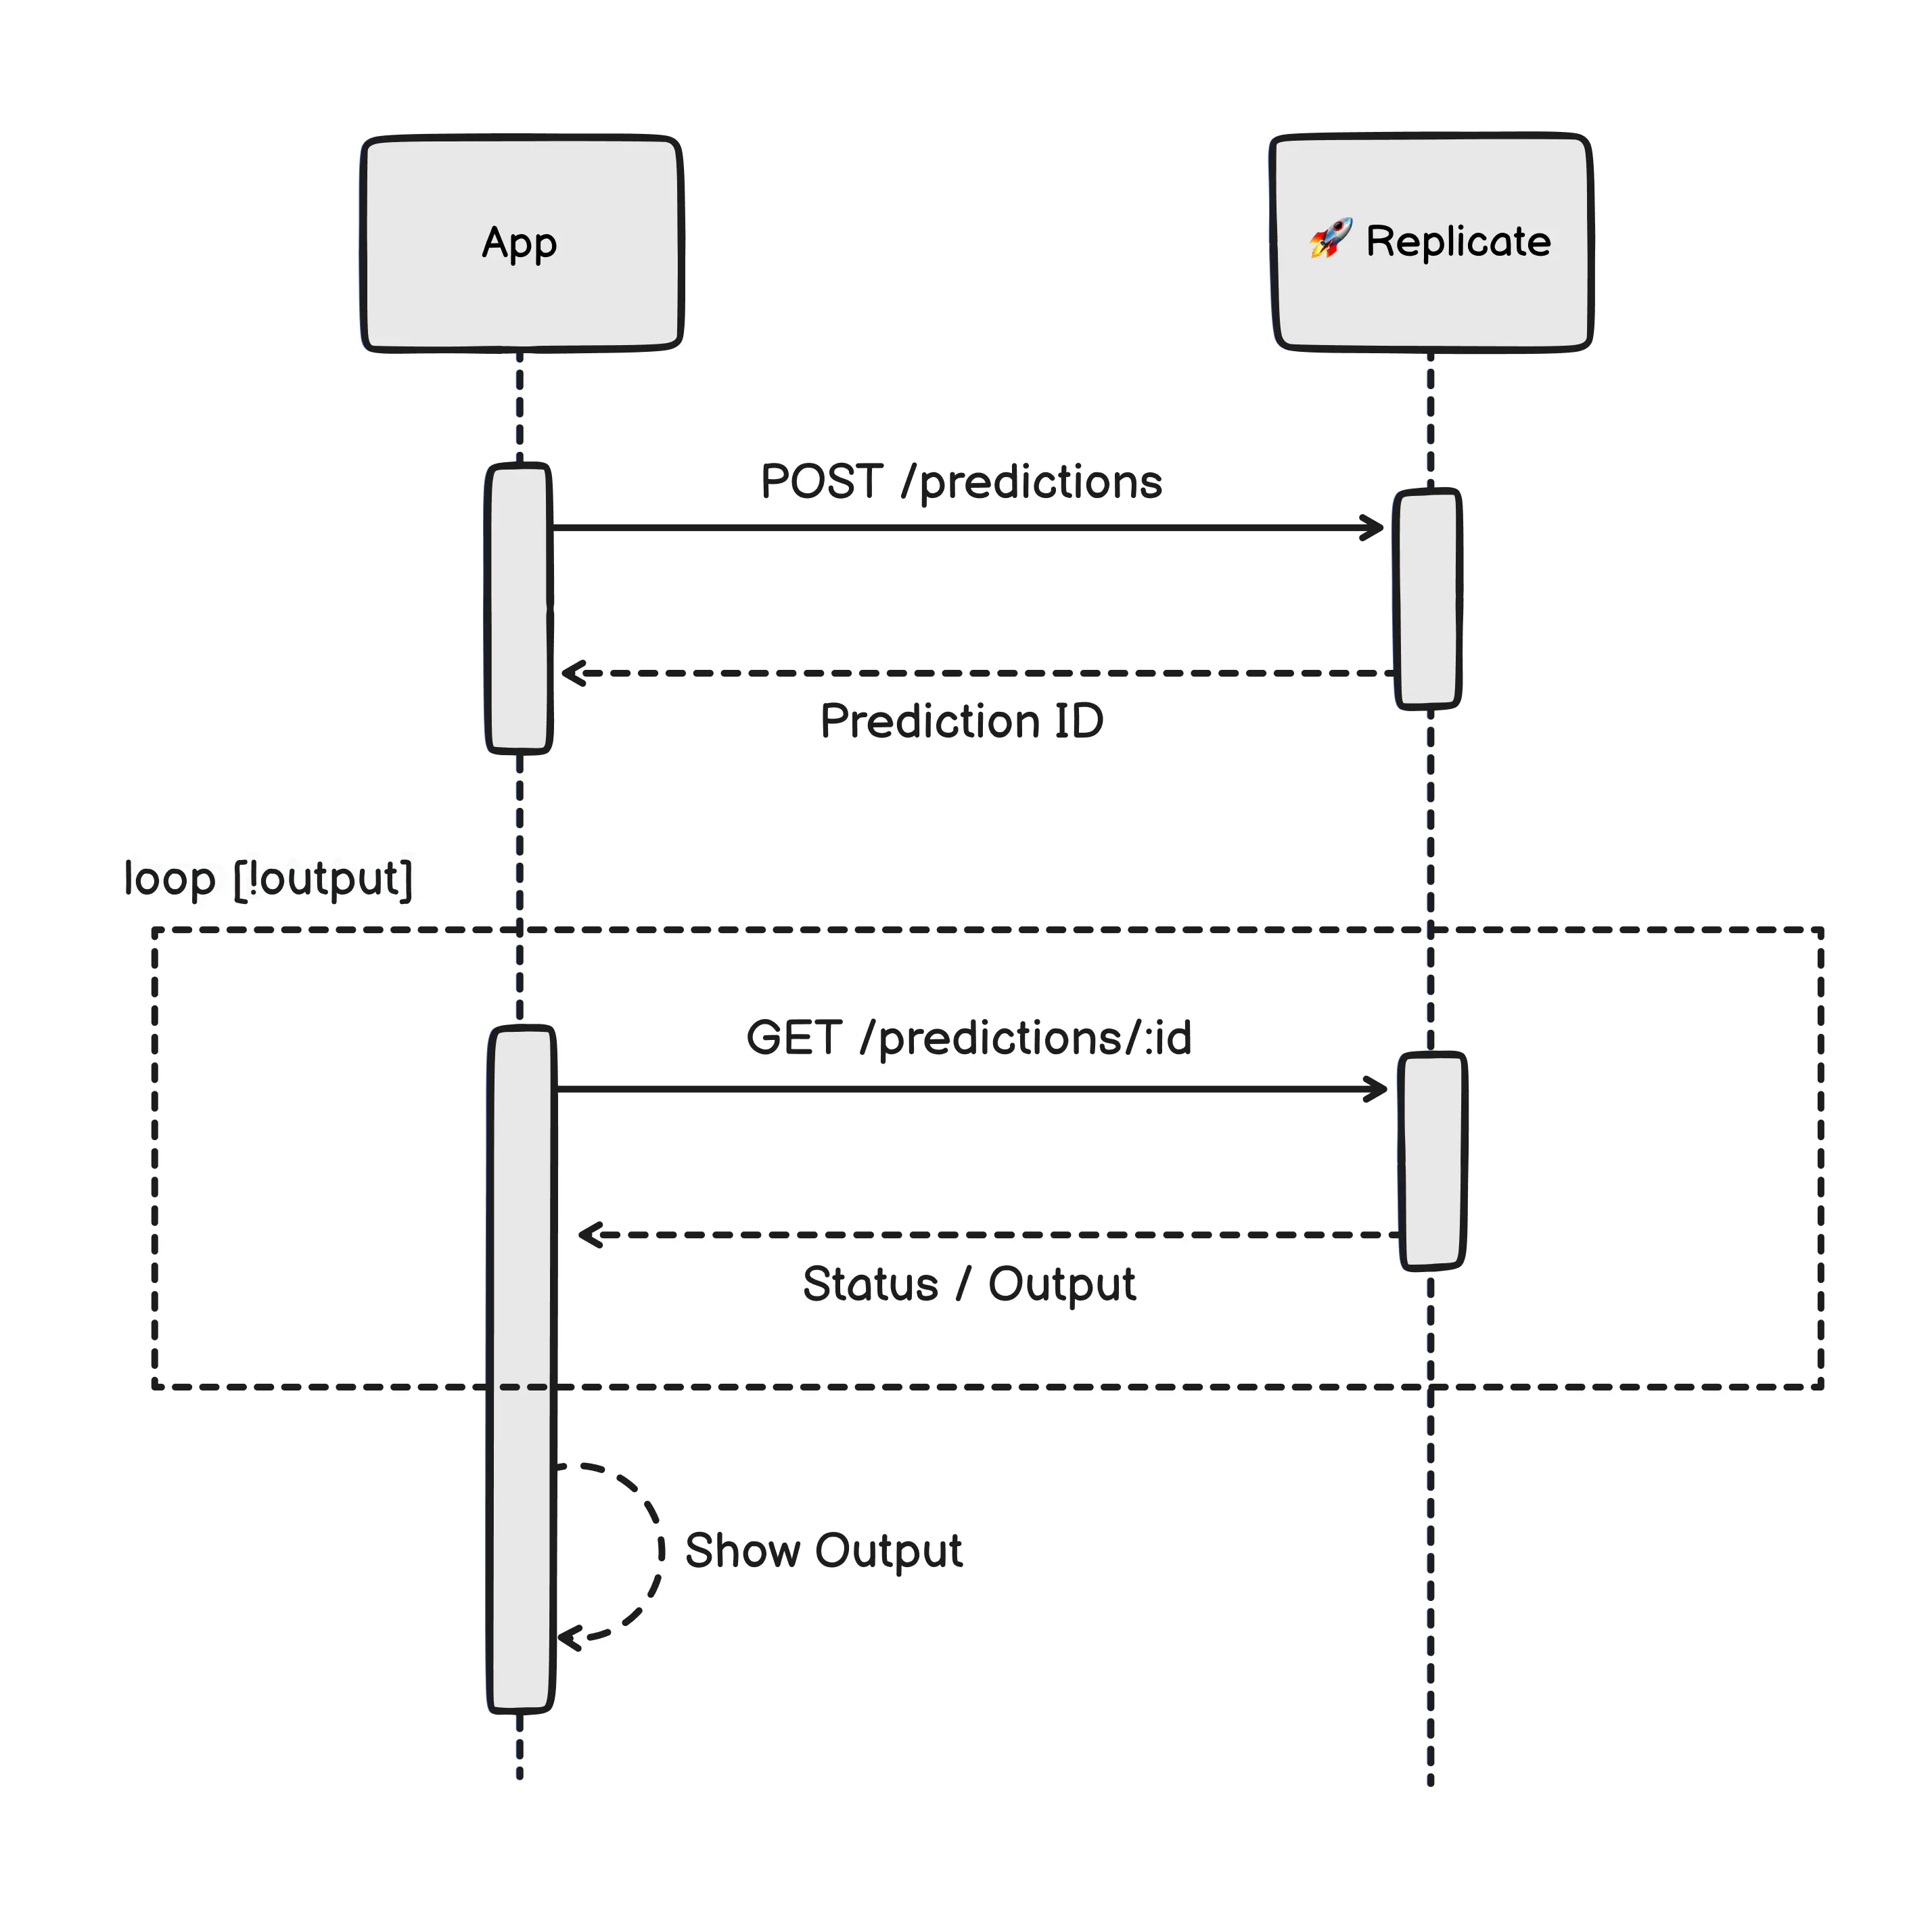
The best thing about this method is that it’s consistent across all models in Replicate, so you can completely change the behavior of your application by simply changing the model’s version ID in the URL and adjusting the inputs accordingly. We’ll see some examples of this in the following few sections.
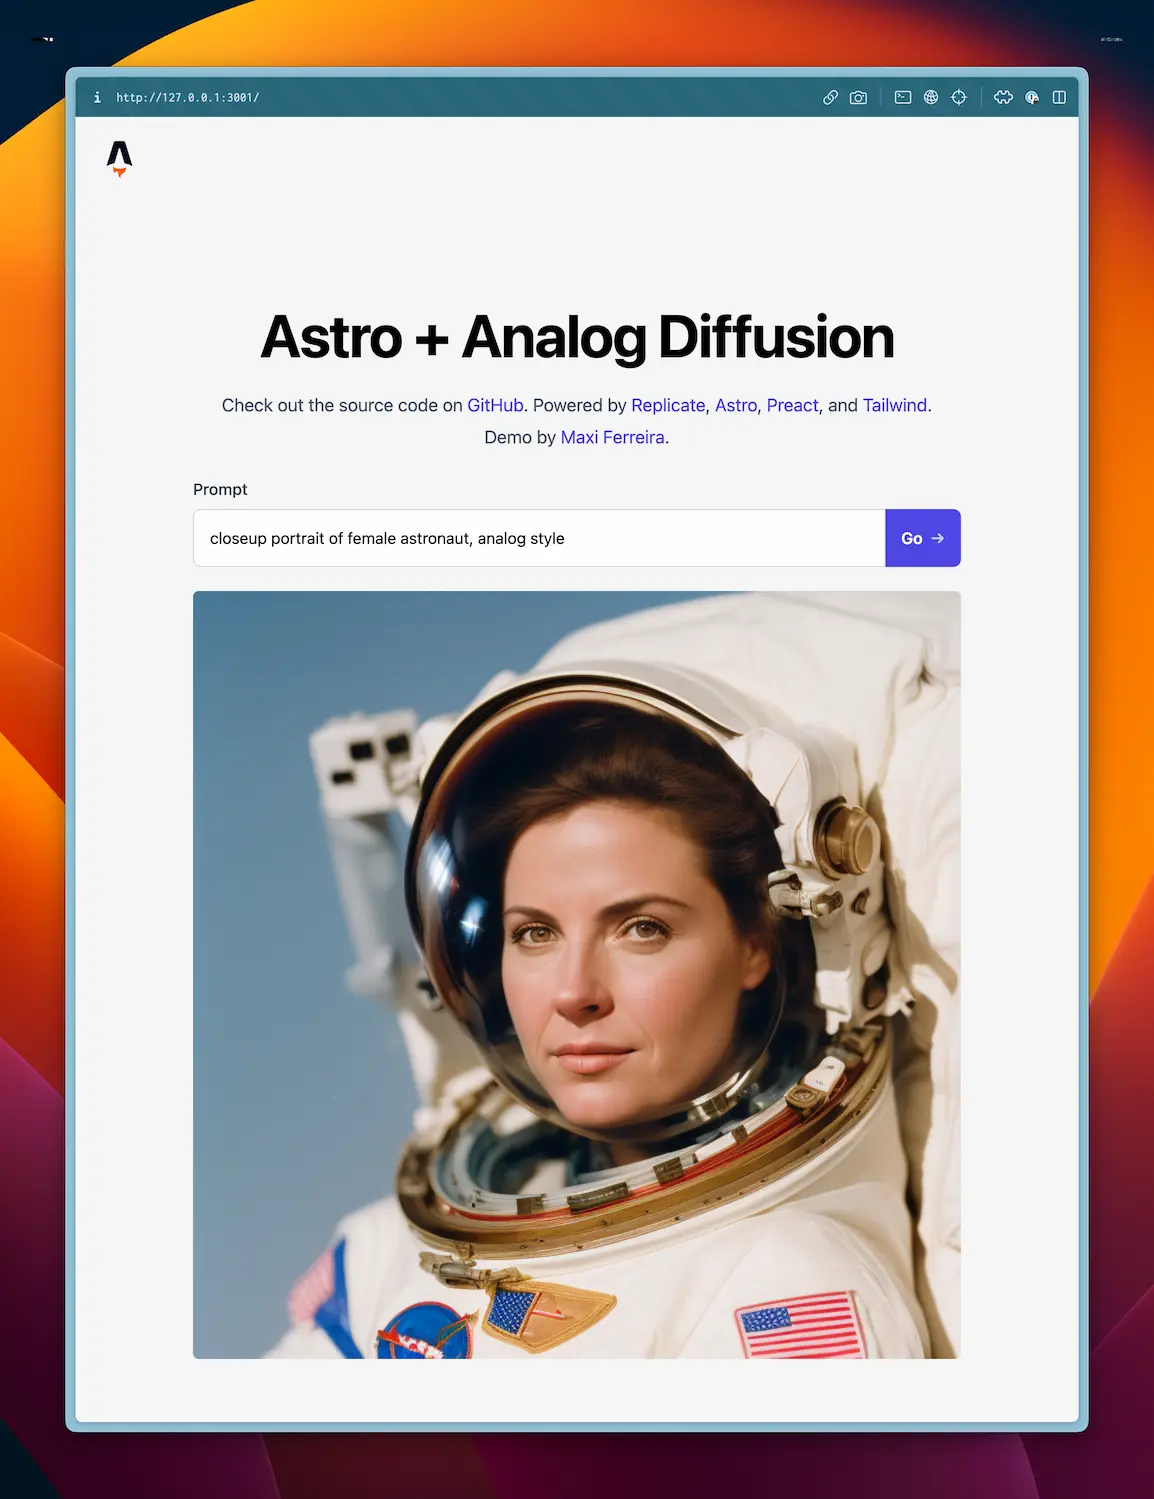
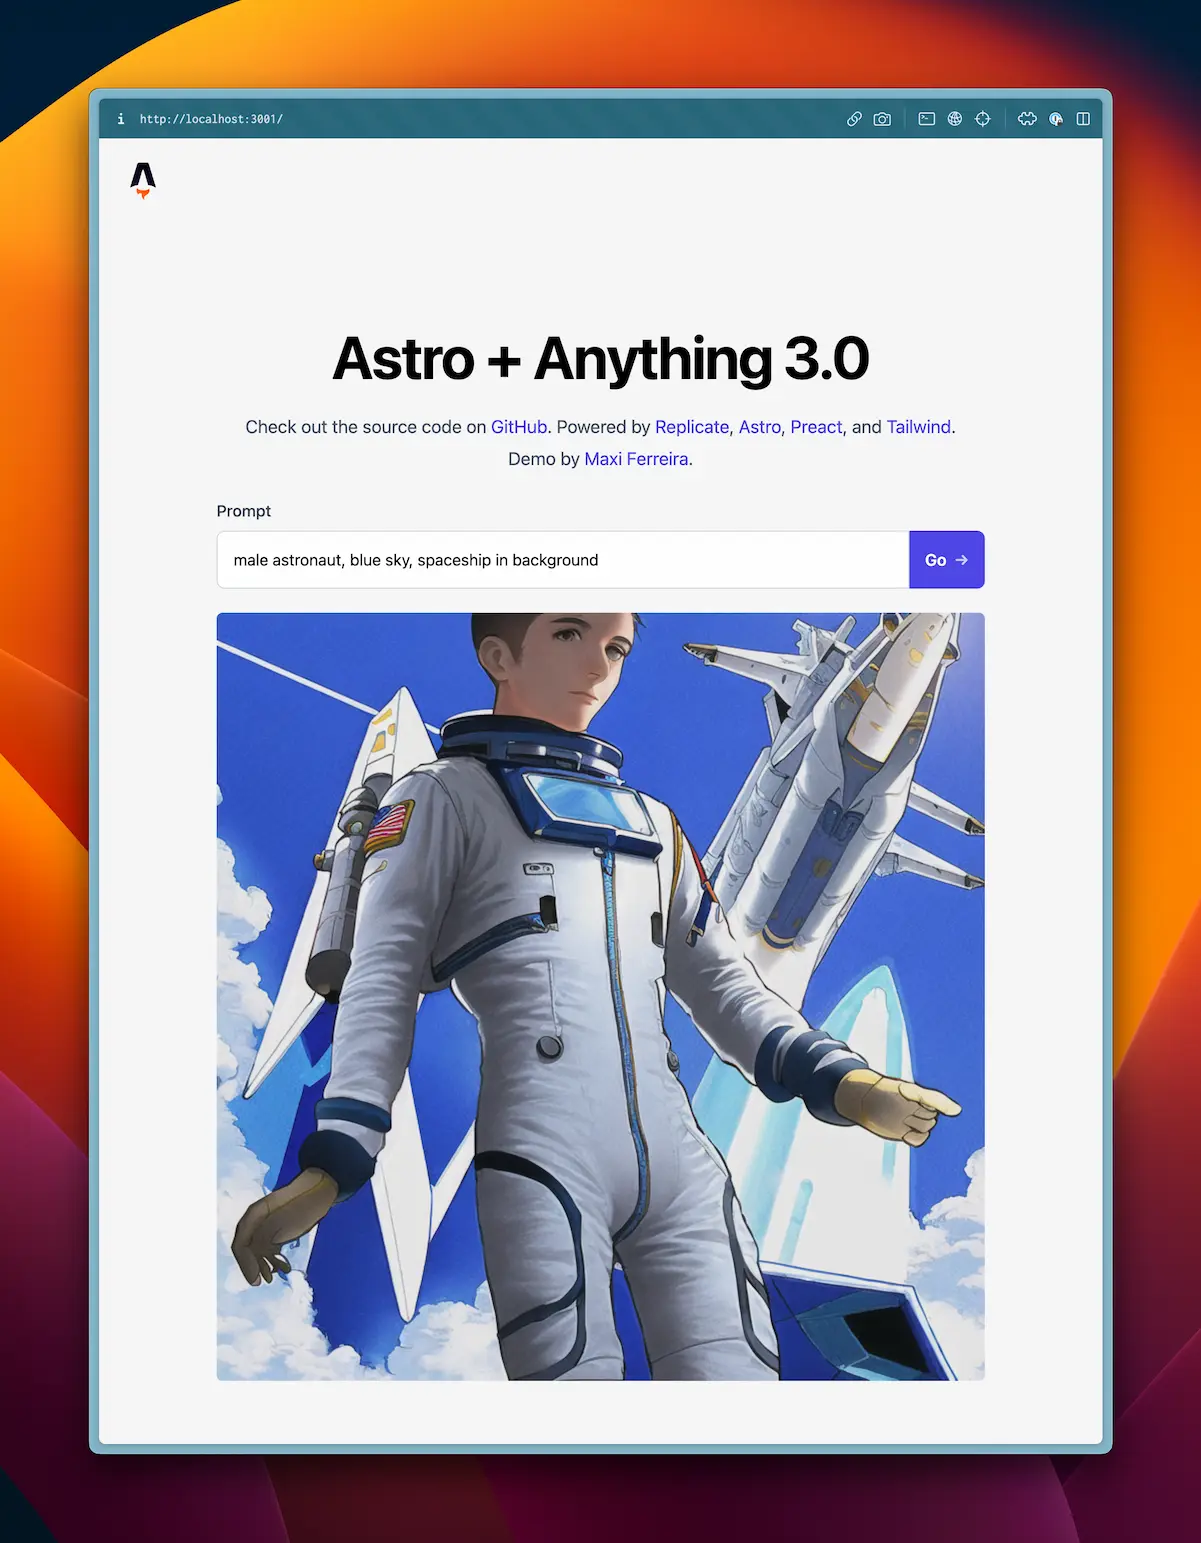
Building a Stable Diffusion Client
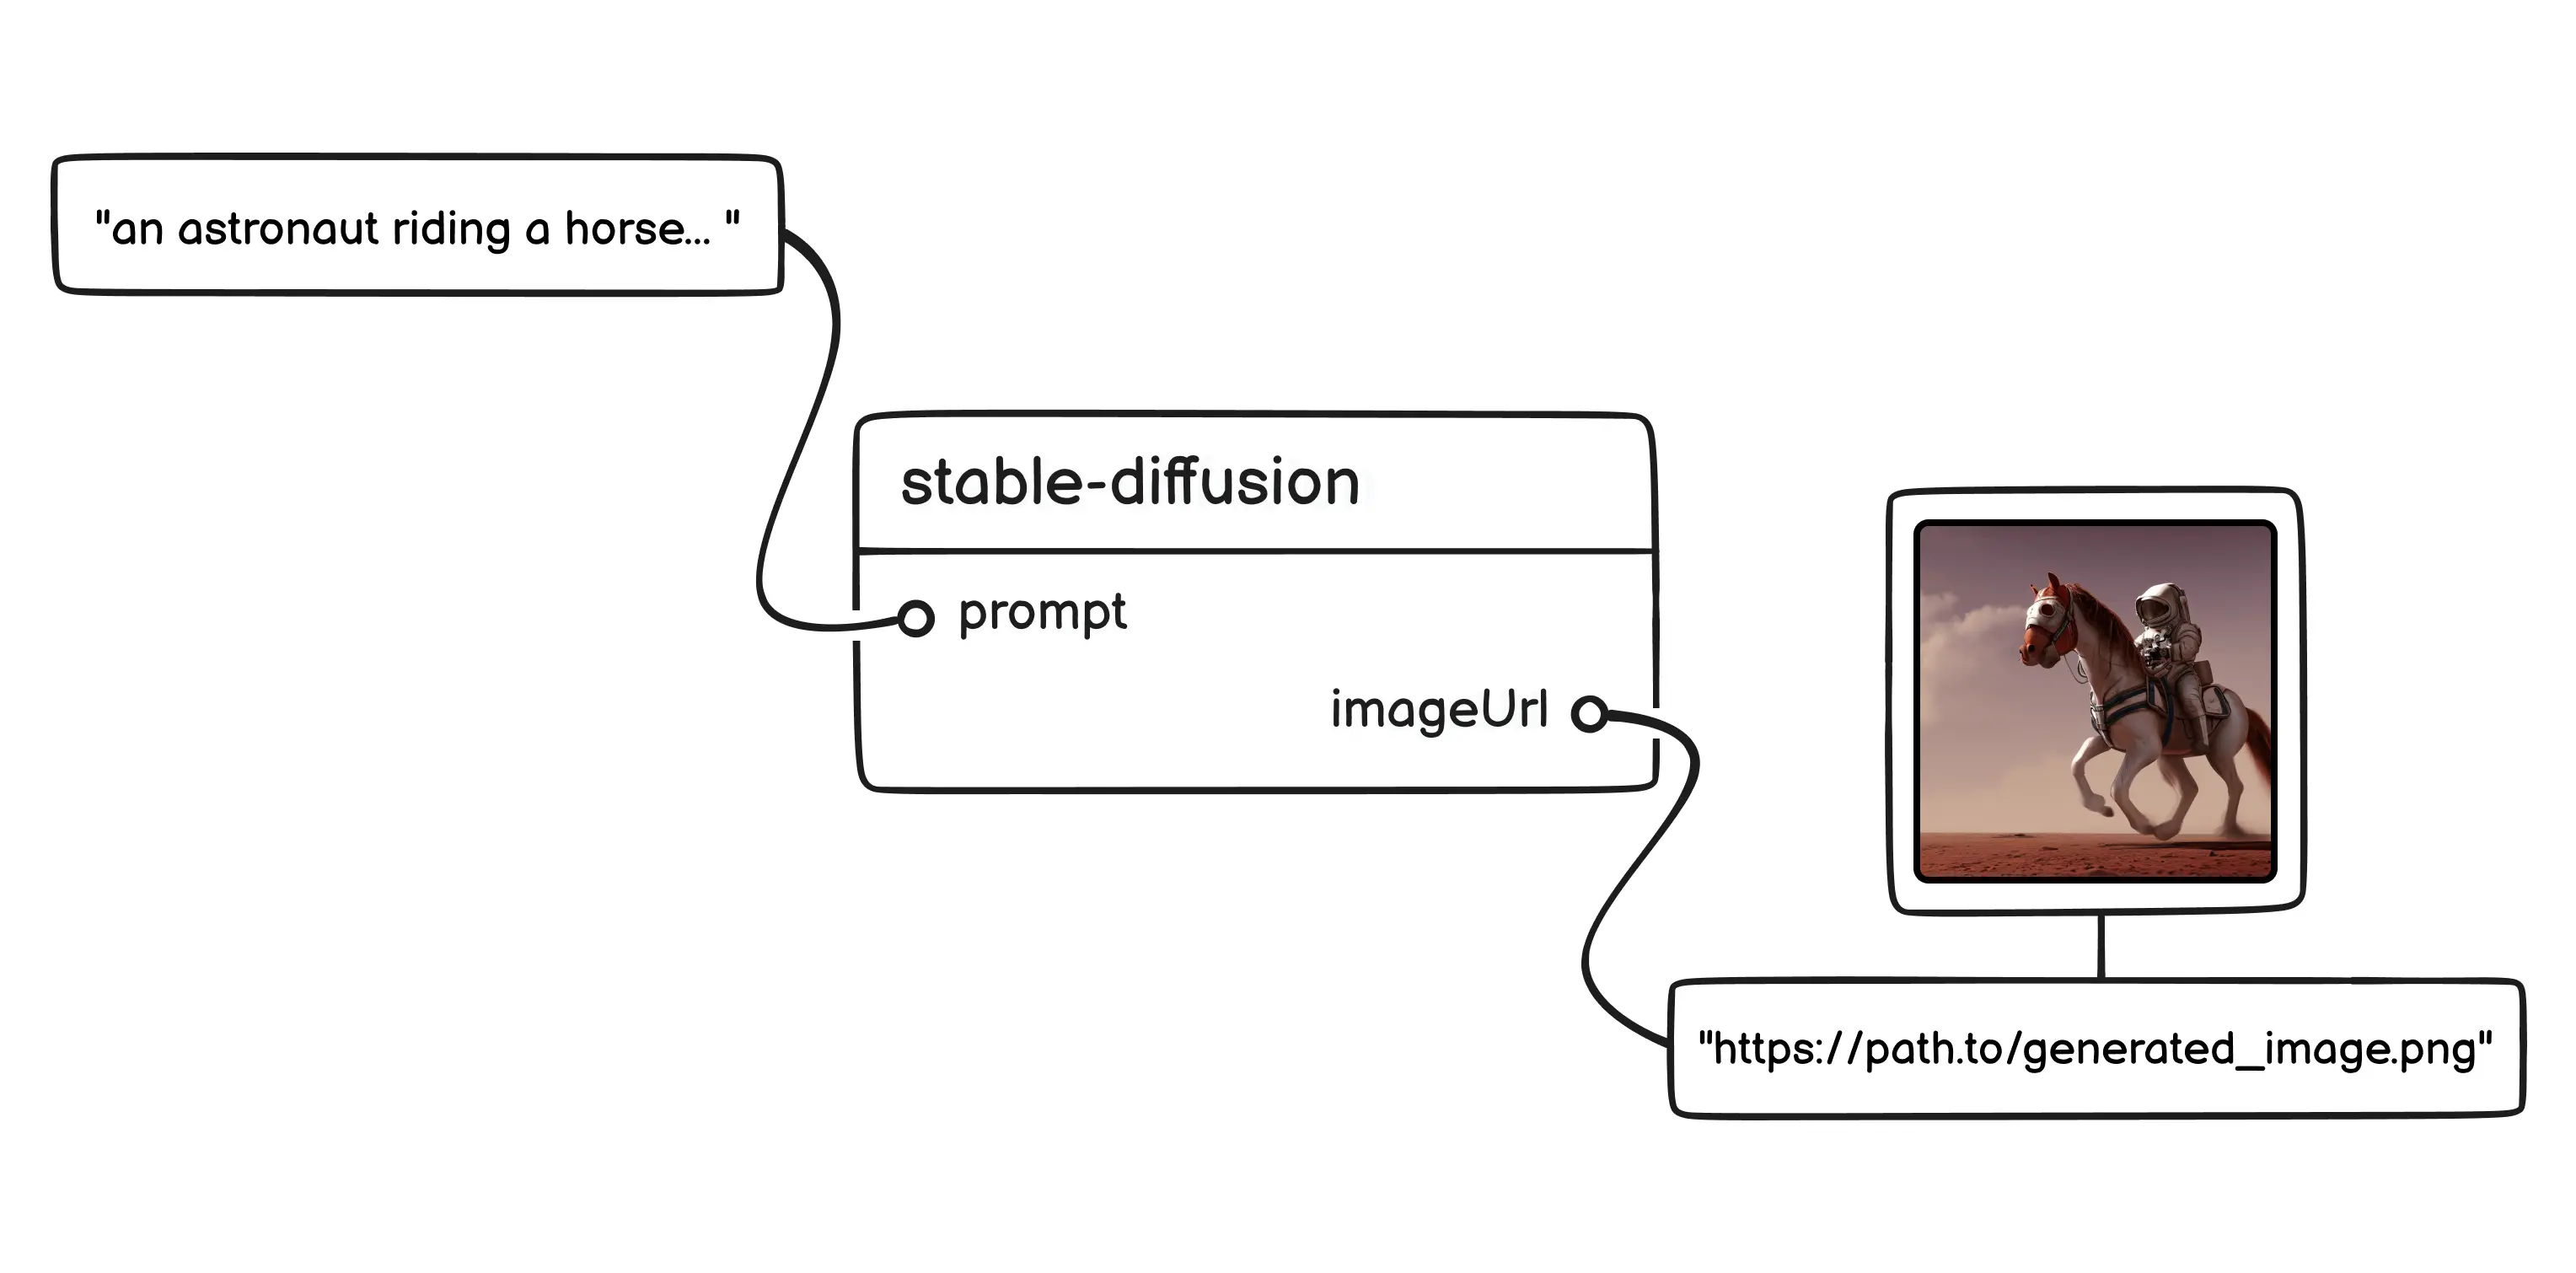
The first app we’re going to build is a Stable Diffusion client. We will use the standard stability-ai/stable-diffusion model for this app, which is one of the simplest to exercise. Its only required input is a string with our prompt, and the output is the URL of the generated image.
The first thing we’ll do is create a couple of API endpoints in our Astro project to act as a proxy of Replicate’s API methods. This way, we will avoid exposing our Replicate API Token to client-side code, which would likely result on strangers running predictions on our dime.
The first endpoint we’ll create is a proxy to the POST /predictions endpoint. Since we’re using Astro with TypeScript, we’ll do this by creating a .ts file that exports a post function. We’ll put the following code in the src/pages/api/preditions/index.ts file.
import type { APIRoute } from 'astro'

// Note: there is an extra . here after the `import.` keyword.
// This was added to prevent an issue with my blog's markdown plugin,
// but you should remove it from your own code.
const REPLICATE_API_TOKEN = import..meta.env.REPLICATE_API_TOKEN

export const post: APIRoute = async ({ request }) => {
  const data = await request.json()

  const response = await fetch('https://api.replicate.com/v1/predictions', {
    method: 'POST',
    headers: {
      Authorization: `Token ${REPLICATE_API_TOKEN}`,
      'Content-Type': 'application/json',
    },
    body: JSON.stringify({
      version:
        'f178fa7a1ae43a9a9af01b833b9d2ecf97b1bcb0acfd2dc5dd04895e042863f1',
      input: { prompt: data.prompt },
    }),
  })

  const result = await response.json()

  if (response.status !== 201) {
    return new Response(JSON.stringify({ detail: result.detail }), {
      status: 500,
      headers: {
        'Content-Type': 'application/json',
      },
    })
  }

  return new Response(JSON.stringify(result), {
    status: 201,
    headers: {
      'Content-Type': 'application/json',
    },
  })
}
The two main things to notice in this function are that we’re passing our Replicate API Token in the Authorization request header (which we need to put in our project’s .env file) and that the request body consists of two attributes:
versiondetermines the specific version ID of the model we’re using. In this case, we’re using the latest version of the stable-diffusion model, which you can find here.inputis an object containing, well, the input of our prediction. The stable-diffusion model can take several input parameters, such aswidthandheightto determine the size of the output image, but for this demo, the only one we care about is theprompttext input. For a full list of available input parameters, check out the API tab on Replicate.
Now we need to create the proxy to the GET /predictions/:id endpoint, which we’ll put in src/pages/api/predictions/[id].ts. Full source code here.
// ...

export const get: APIRoute = async ({ params }) => {
  const id = params.id

  const response = await fetch(
    'https://api.replicate.com/v1/predictions/' + id,
    {
      headers: {
        Authorization: `Token ${REPLICATE_API_TOKEN}`,
        'Content-Type': 'application/json',
      },
    }
  )

  // ...
}
With these two pieces in place, all that is left is to create the UI for our application, which, fortunately for us, only consists of a text input and a submit button. I’m using Preact to build this component, but you can use your UI framework of choice.
You can find the entire source code of this component in the repo, but the interesting bit here is the onSubmit function, which we’ll call when the user enters a prompt:
async function onSubmit(event: Event) {
  event.preventDefault()

  const formData = new FormData(event.target as HTMLFormElement)
  const data = Object.fromEntries(formData.entries())
  const response = await fetch('/api/prediction', {
    method: 'POST',
    headers: {
      'Content-Type': 'application/json',
    },
    body: JSON.stringify({
      prompt: data.prompt,
    }),
  })

  let prediction = await response.json()
  if (response.status !== 201) {
    setError(prediction.detail)
    return
  }

  setPrediction(prediction)

  while (prediction.status !== 'succeeded' && prediction.status !== 'failed') {
    await sleep(1000)
    const response = await fetch('/api/prediction/' + prediction.id)
    prediction = await response.json()

    if (response.status !== 200) {
      setError(prediction.detail)
      return
    }
    setPrediction(prediction)
  }
}
We start by making a request to our proxy POST /api/predictions endpoint, sending the prompt in the request body. This request will give us back the prediction’s initial state, containing its ID and initial status: "starting".
Once that request completes, we start making requests to the GET /api/predictions/:id endpoint in a loop, until we get back a status of either succeeded or failed. If the request succeeds, we’ll find the resulting image in the prediction.output attribute, which we can then show to the user.
We’re polling from the client-side here, but we could have also done it on the server and exposed only a single endpoint to the client. In some cases, diffusion models can take a long time to resolve, so if you’re worried about requests timing out, client-side polling might be a better alternative.
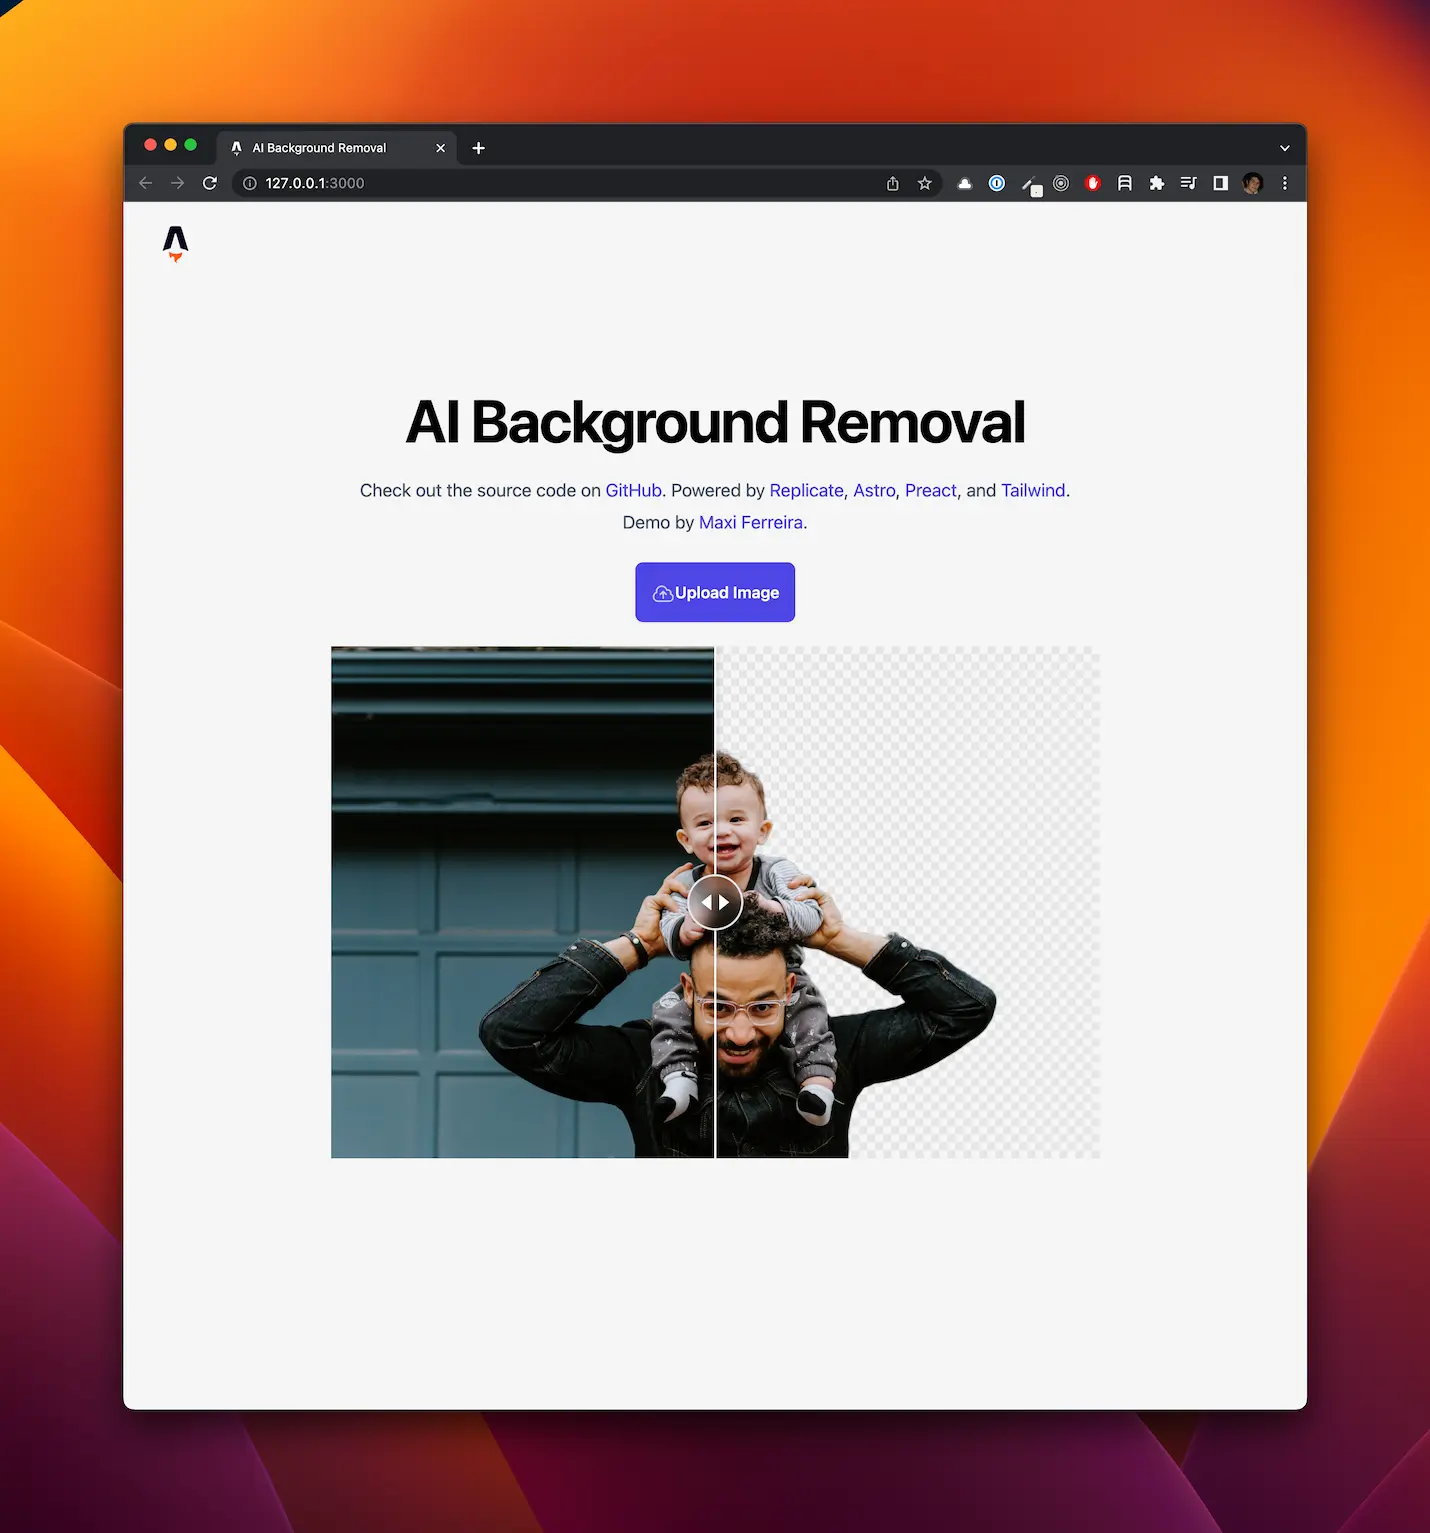
Background Removal Client
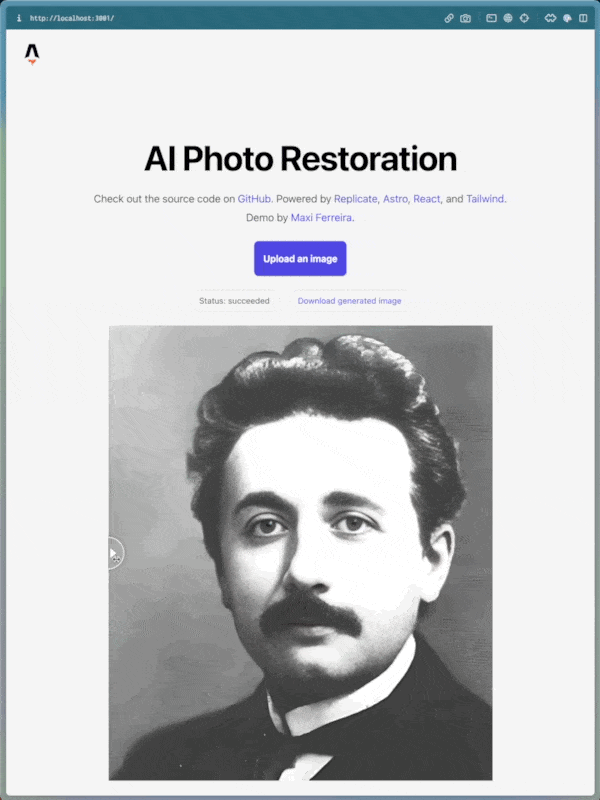
For our second app, we will use the MODNet machine learning model to create a background removal app. The implementation will look almost exactly the same as our Stable Diffusion client, except for one thing: since the MODNet model expects an image URL as its input, we first need to upload the image somewhere. We will use the Upload.io service to do this because it is extremely simple to set up Big props to Hassan El Mghari who’s open-sourced photo restoration app led me to discover this service. , but you can use your own image hosting service, or manually upload the files to your favorite static asset server.
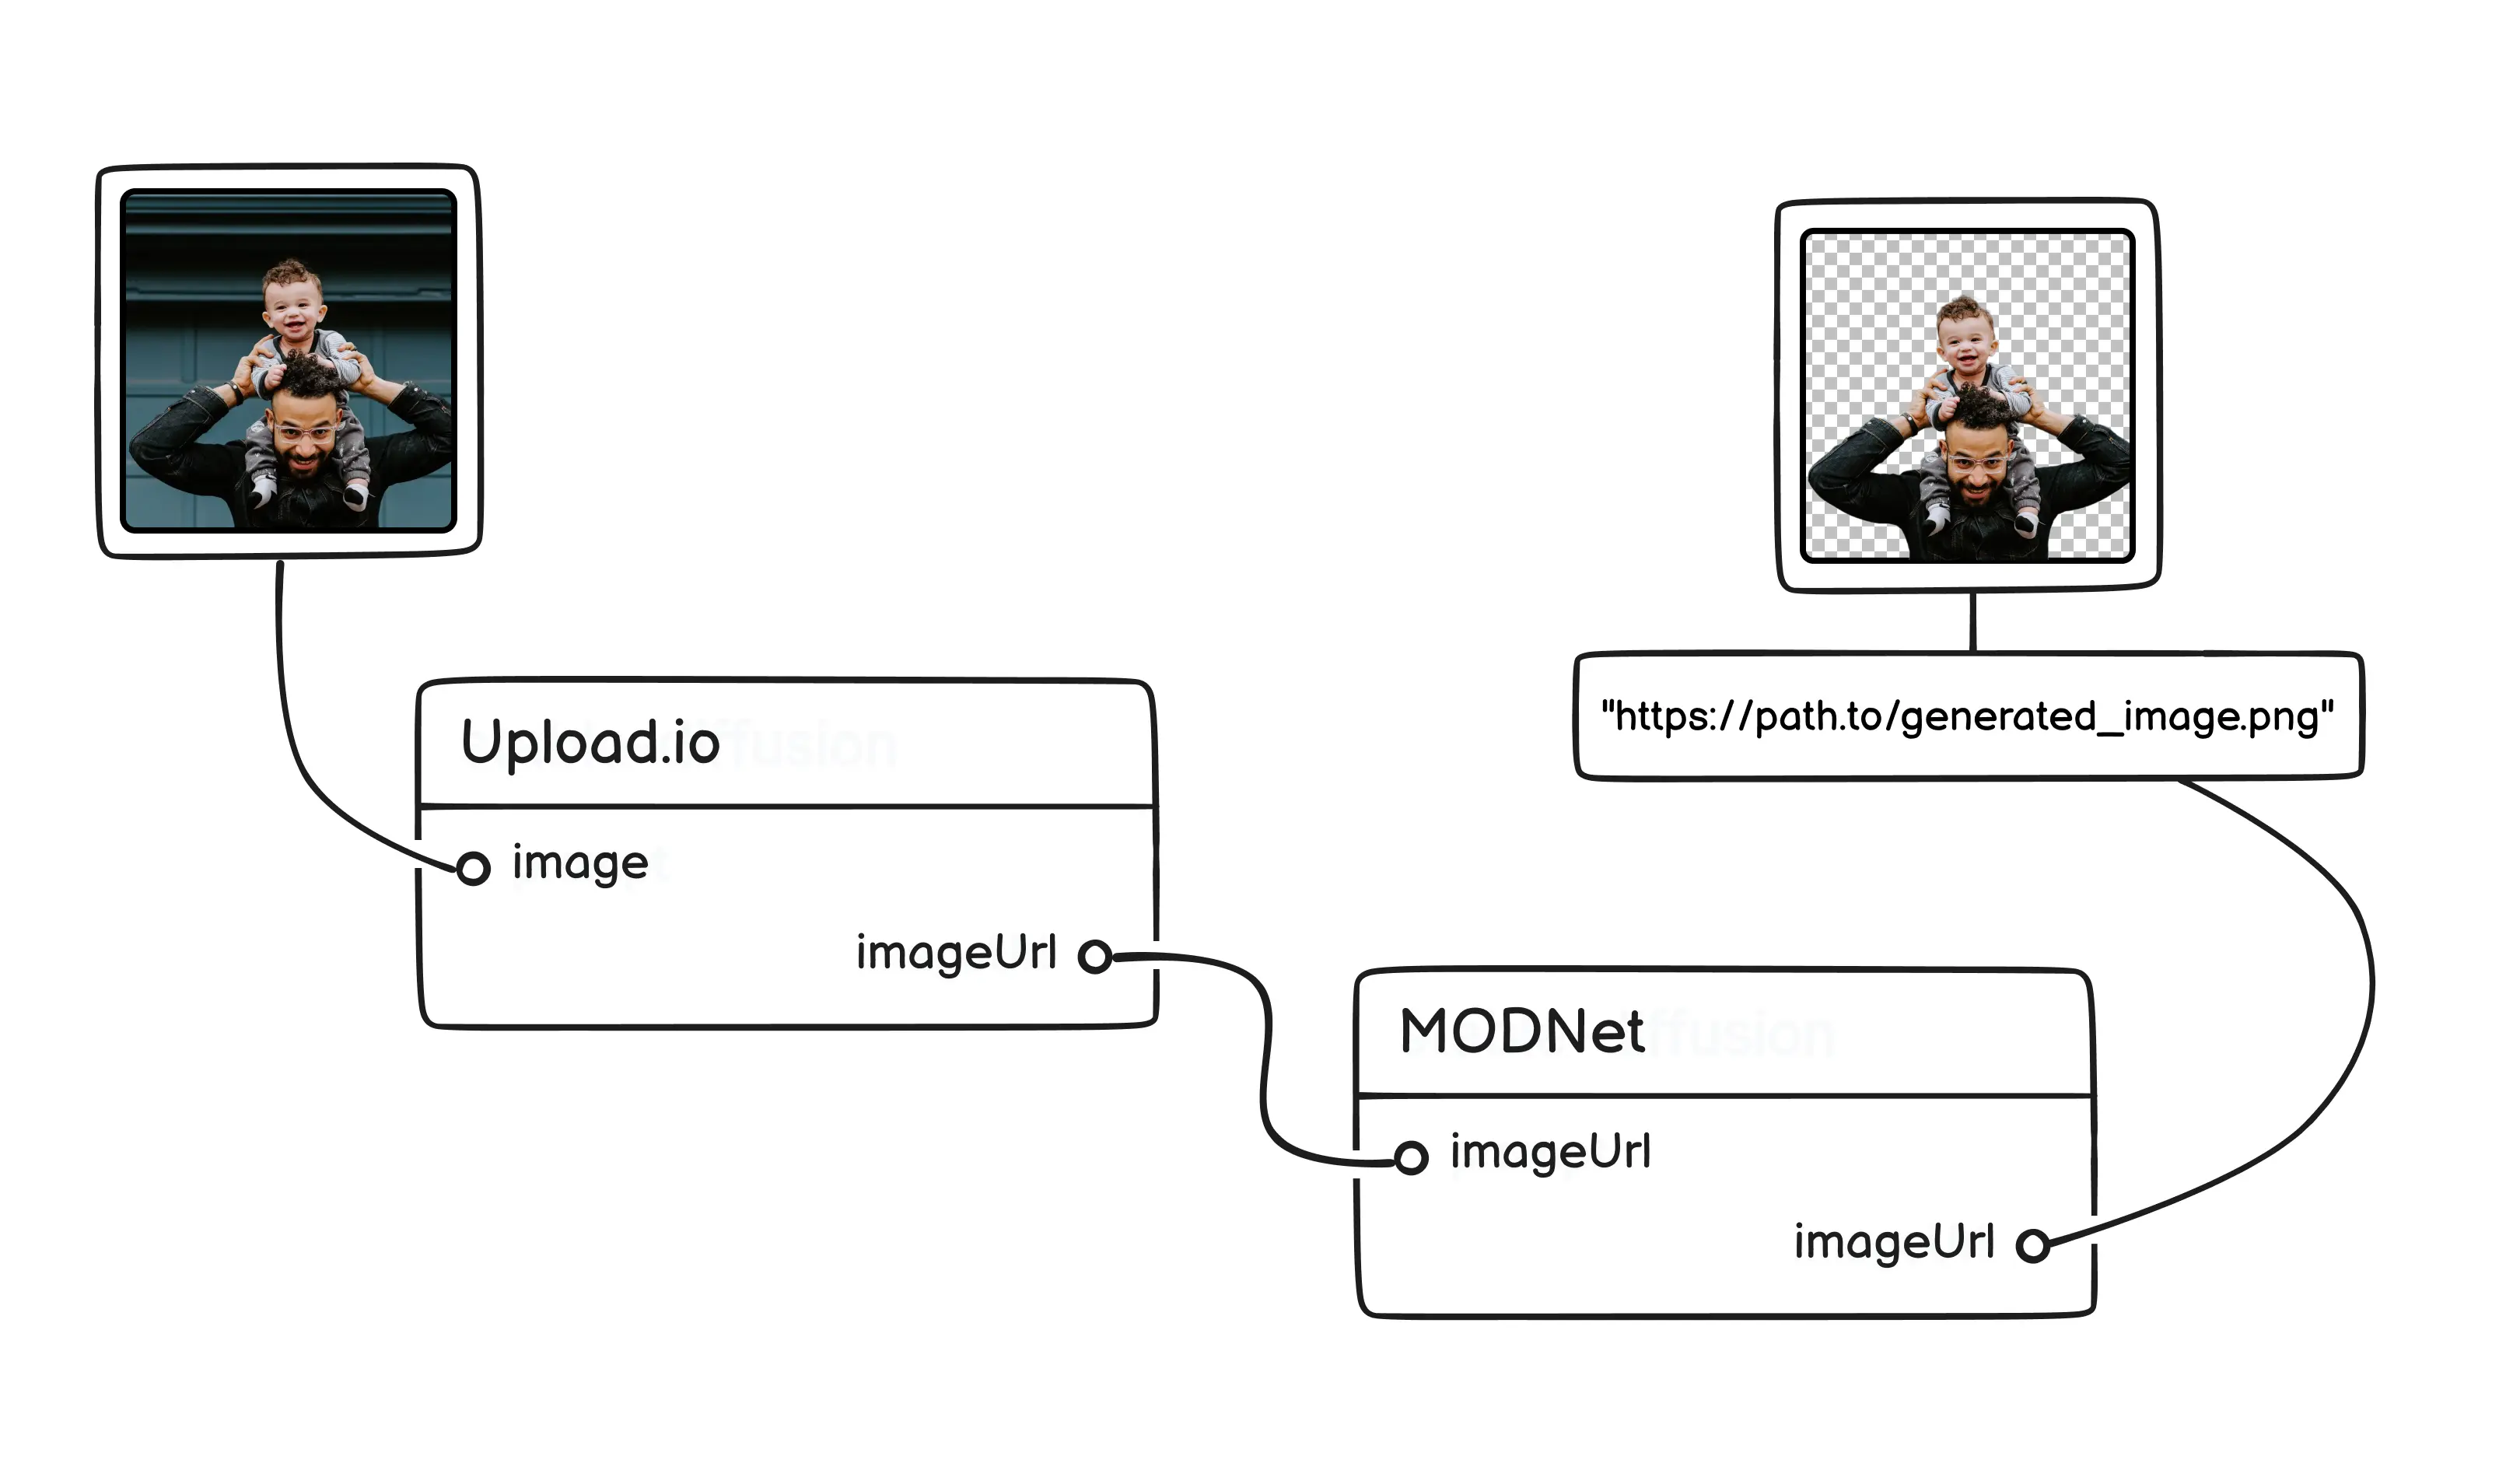
We will use the same two API endpoints we created for our first app, POST /predictions and GET /prediction/:id, with only a small change. We need to change the request body of the POST request to Replicate, so that we send the version ID of the MODNet model, and change the input to send an image instead of a prompt.
// ...

const response = await fetch('https://api.replicate.com/v1/predictions', {
  method: 'POST',
  headers: {
    Authorization: `Token ${REPLICATE_API_TOKEN}`,
    'Content-Type': 'application/json',
  },
  body: JSON.stringify({
    // Change 1: use a version ID for the MODNet model
    version: '4f40b36544786857fbc499be0996ba5152627ce61d614eeab7e19a7e1fd61ac6',
    // Change 2: pass the `image` property as input
    input: { image: data.image },
  }),
})

// ...
The UI for this app looks a bit different than the Stable Diffusion client, but it’s still quite simple. We don’t need a text prompt for this model, but we do need to provide a way for users to upload their images. For convenience, we will use the uploader and react-uploader packages provided by Upload.io that make this process straightforward (full source code on GitHub):
import { Uploader } from 'uploader'
import { UploadButton } from 'react-uploader'

// ...

const uploader = Uploader({
  apiKey: process.env.PUBLIC_UPLOAD_IO_API_KEY,
})

const options = {
  maxFileCount: 1,
  mimeTypes: ['image/jpeg', 'image/png', 'image/jpg'],
  editor: { images: { crop: false } },
  styles: { colors: { primary: '#4f46e5' } },
}

function Form() {
  // ...

  function handleImageUploaded(files: File[]) {
    if (files.length > 0) {
      runPrediction(files[0].fileUrl)
    }
  }

  return (
    // ...
    <UploadButton
      uploader={uploader}
      options={options}
      onComplete={handleImageUploaded}
    >
      {({ onClick }) => <button onClick={onClick}>Upload an image</button>}
    </UploadButton>
    //...
  )
}
Once the image is uploaded, we’ll call a runPrediction function with the URL of the freshly uploaded image. This function is almost an exact copy of the onSubmit callback from the first app; the main difference is that we’ll pass the image URL instead of a text prompt in the request body.
async function runPrediction(inputImageUrl: string) {
  setError(null)

  const response = await fetch('/api/prediction', {
    method: 'POST',
    headers: {
      'Content-Type': 'application/json',
    },
    body: JSON.stringify({
      image: inputImageUrl,
    }),
  })

  let prediction = await response.json()
  //...
}
The rest of the function is the same as before: after making the request to the POST /predictions endpoint and getting back the Prediction ID, we’ll start polling the GET /predictions/:id endpoint until we get a response, which in this model, is also an image.
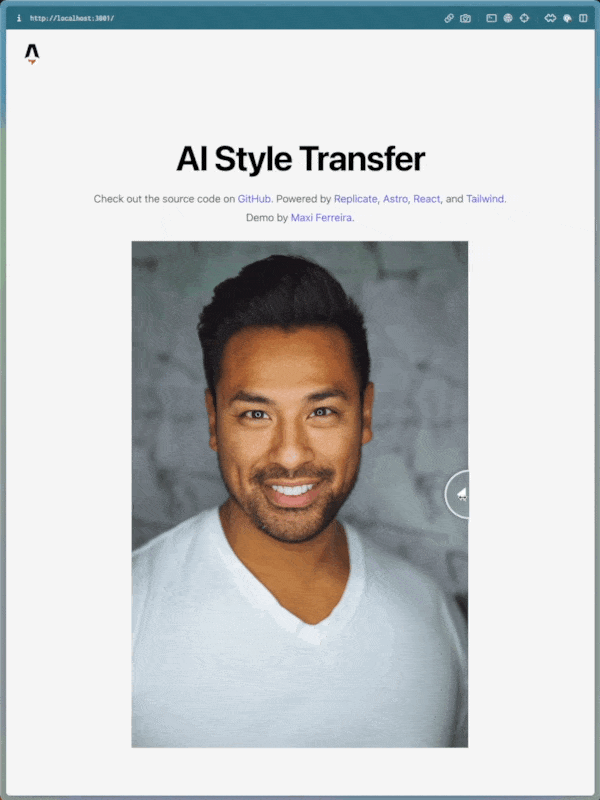
I’m using the react-compare-slider package here to show a fancy slider with both the original image and the one with the background removed. Here’s what the end result looks like:
Exploring Other Models
As we saw in the previous sections, the code for our two apps looks very similar. Most of the changes were in the UI, but the server-side code barely changed at all. That is the beauty of a standard API such as Replicate—we can completely repurpose our app by only changing a few lines of code.
For our first app, for example, we can try any other image generation model by simply changing the version ID in the POST /predictions request. Here are some examples of how the same prompt looks like using different diffusion models:
And we can do the same thing for our background removal app. We can repurpose it by simply changing the version ID to that of a different model with the same interface (an image URL as both input and output). Here are some examples of how the app looks like using an image restoration model and an upscaling model:
Replicate has tons of public models to explore, including speech-to-text models, image-to-text models, style transfer models, and even Pokémon generation models. You can use any of them with the techniques we’ve covered in this article, and I highly recommend you go and experiment with as many as you can.
Conclusion
One consequence of the ubiquitous influence of AI in our daily lives is that this technology is becoming more and more accessible every day. Thanks to products like Replicate, you don’t need a Ph.D. in Artificial Intelligence to take advantage of it—if you can call an API endpoint, you have everything you need to add AI superpowers to your applications.
But the benefits of a simple abstraction go beyond the ability to create apps quickly. They also give us a high-level understanding of what these models do and what their interfaces look like, and we can use that knowledge as a starting point to go deeper.
I’ll cover more advanced topics in the next few blog posts, such as training your own models, and hosting and running them in the cloud. If you’d like to follow along, you can subscribe to the blog’s RSS or follow me on Twitter.
Have fun, and thank you for reading~